

Quick Answer: If your plan's instructions state that "installation does not immediately start the timer," we usually recommend installing it 1–2 days before departure while you still have a stable Wi-Fi connection, and keeping the travel eSIM turned off for now. Upon arriving at your destination, turn the eSIM on, set it as your mobile data line, and enable data roaming as required. However, if your plan starts counting days immediately upon installation, upon manual activation, or on a specific scheduled date, you must follow those exact rules. Do not apply the rules of other brands or different plans to the eSIM you just purchased.
"Should I install my eSIM before I leave, or wait until I arrive at my destination?" This is one of the most common questions from travel eSIM users.
Many travelers worry that installing the eSIM early will immediately consume their plan's validity days, so they wait until they reach the airport to scan the QR code. While this seems safe, they often run into issues such as:
- Unstable airport Wi-Fi.
- An unscannable QR code.
- A carrier-locked phone.
- A device version that doesn't actually support eSIM.
- The need to manually enter an APN.
- An installation email that won't load.
- A QR code that is already used or expired.
- Customer support being offline due to time zone differences.
Conversely, if you install too early without reading the activation rules, you might accidentally start the timer on certain plans before you even leave home.
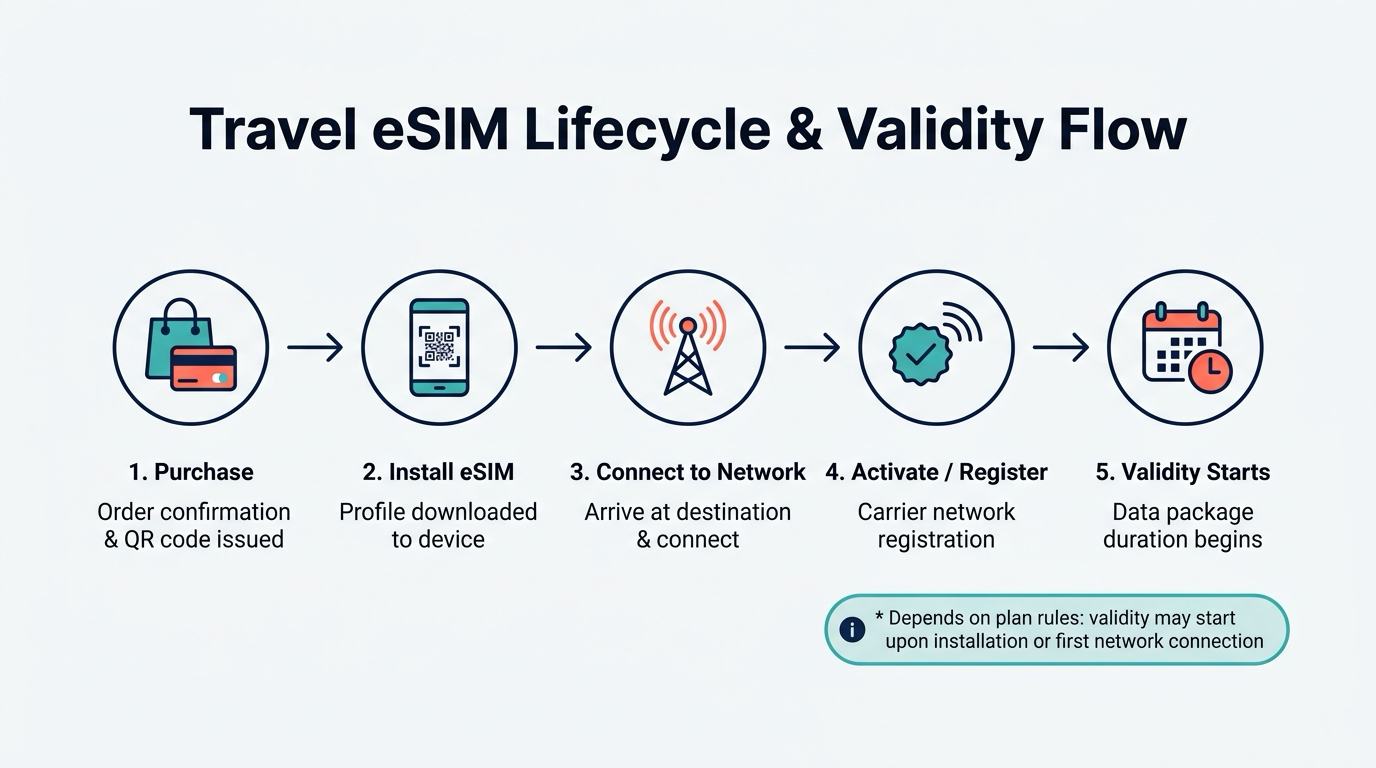
The correct approach isn't always "install early" or "install upon arrival." Instead, you first need to understand five distinct points in time.
Understand the 5 Different Points in Time
1. Purchase Time
This is the moment you complete your payment and create an order.
Completing a purchase does not necessarily mean the plan is active, but some products have rules like:
- Must be installed within a specific number of days after purchase.
- Must be activated before a certain date.
- Refund or cancellation deadlines.
- The expiration date of the QR code or activation details.
Even if you aren't departing yet, don't ignore any installation deadlines specified in your order.
👉 Related Reading: How Much Data Do I Need? eSIM Data Usage & Plan Comparison Guide
2. Installation Time
Installation is the process of downloading the eSIM profile to your phone.
Once completed, a new line will appear in your phone's Cellular or SIM settings. This indicates the device has saved the eSIM profile, but it does not necessarily mean:
- You have connected to a destination network.
- You have started consuming data.
- The validity period has started.
- The eSIM has been fully activated on the provider's end.
Installation and activation are two different concepts.
graph LR
    A[1. Purchase] --> B[2. Install]
    B -. May require .-> C[3. Manual Activation]
    B --> D[4. First Connection]
    C --> D
    D --> E[5. Timer Starts]

    classDef highlight fill:#bf953f,stroke:#fff,stroke-width:2px,color:#fff;
    class E highlight;
3. Manual Activation Time
A few plans require the user to press an "Activate," "Start," or similar button on the provider's website, app, or order management page.
If a product requires manual activation, pressing that button might:
- Immediately start the timer.
- Move the eSIM into a state waiting for its first network connection.
- Schedule a start date in the future.
- Allow the eSIM to register on the network when it reaches the destination.
The exact behavior depends entirely on the product description.
4. Time of First Connection to a Supported Network
Many travel eSIMs only activate after the phone connects to a supported partner carrier network at the destination for the first time.
For example, a Japan eSIM might only complete activation and start its timer once you arrive in Japan and connect to a supported local network.
If you complete the installation in your home country, your phone might display:
- Activating...
- No Service
- Unable to connect to a network
- Turned on but not registered
If the plan only activates at the destination, these statuses do not mean the installation failed.
5. Validity Period Start Time
The plan's countdown timer might start at any of these moments:
- When the purchase is completed.
- When installation is completed.
- Upon manual activation.
- Upon the first connection to a supported network.
- On a pre-selected date and time.
- When the provider's system confirms activation.
Therefore, "the phone says the eSIM is ON" does not automatically mean "the plan has started counting down."
The Safest Default Approach
graph TD
    A[Preparing to Depart] --> B{Does installation start the timer immediately?}
    B -->|Yes| C[Install right before departing or upon arrival]
    B -->|No| D{Is there a specified start date?}
    D -->|Yes| E[Follow product instructions]
    D -->|No| F[Install 1-2 days before departure<br>Keep OFF until arrival]
    F --> G{Requires manual activation?}
    G -->|Yes| H[Activate manually based on instructions]
    G -->|No| I[Activates automatically upon first connection at destination]
If the product page or order clearly states that early installation is allowed and that installation does not start the timer, we recommend the following flow:
1-2 Days Before Departure
- Confirm your phone supports eSIM.
- Confirm your phone is not carrier-locked.
- Connect to stable Wi-Fi.
- Save your QR code and manual installation details.
- Install the eSIM on your phone.
- Give the line a clear label (e.g., Caylet Japan eSIM).
- Confirm it appears in your SIM management settings.
- Keep the travel eSIM turned OFF for now. 9. Turn OFF data roaming for your original SIM card.
- Save the APN, list of partner networks, and customer support contact details.
Upon Arrival at the Destination
- Turn ON the travel eSIM.
- Set it as your Cellular Data line.
- Turn on Data Roaming as instructed by the product.
- Turn off unnecessary automatic data switching features.
- Wait for the phone to connect to the partner network.
- Turn off Wi-Fi to test the mobile data connection.
- Toggle Airplane Mode or restart your phone if necessary.
This approach balances two goals:
- It gives you time before your trip to discover and resolve compatibility or installation issues.
- It prevents you from accidentally activating the travel eSIM early when you don't need it.
Choose a Caylet eSIM for Your Itinerary
Which Plans Are Best for Early Installation?
A plan is generally suitable for early installation if:
- The product explicitly states it activates upon the first connection to the destination network.
- Installation itself does not start the timer.
- The QR code is valid for use before departure.
- You are within the allowed installation timeframe for the plan.
- Your phone requires Wi-Fi to download the eSIM profile.
- You want to test device compatibility in advance.
- You are unsure if you will have reliable Wi-Fi upon arrival.
- Your flight lands late, meaning customer support might be offline if you run into trouble.
Even if early installation is allowed, we still recommend keeping the travel eSIM turned off until you arrive unless the product explicitly requires you to turn it on or manually activate it early.
When Should You Wait Until Close to Departure?
Avoid early installation in the following scenarios:
The Timer Starts Upon Installation
If the plan's validity period begins the moment you download the profile, installing it a week early wastes several days of your allowance. Install these products closer to your departure date, but still leave enough time to troubleshoot if needed. Do not wait until the final minutes before boarding.
Fixed Installation or Activation Deadlines
Some QR codes or orders require installation within a specific number of days after purchase. Do not buy the eSIM too early if your trip is far in the future.
Very Short Validity Periods
For plans that only last 1 or 3 days, any early timer activation can significantly impact your trip.
Product Requires Manual Start
Do not prematurely click "Activate," "Start Plan," or similar buttons if you are not ready to use it.
Product Uses a Pre-Scheduled Start Date
If you selected a start date during purchase, check:
- Does the date use the destination's time zone?
- Does it start at local midnight?
- Can the date be changed?
- How is the date calculated if you cross the International Date Line?
When Might You Need to Wait Until Arrival?
Although we usually recommend checking compatibility in advance, some products or situations may require you to install upon arrival:
- The product explicitly prohibits early installation.
- Installation immediately starts the timer, and you need every hour of the plan for the destination.
- The local carrier requires the device to be physically present at the destination.
- You need to connect to a local network to download or verify the profile.
- You must complete real-name registration locally.
- You must receive activation details at an airport kiosk or physical store.
- The plan can only be purchased via a local carrier's app.
- The provider's customer support explicitly instructs you to perform the setup after arrival.
If you must install upon arrival, you should still prepare beforehand:
- Confirm your phone is compatible.
- Confirm it is unlocked.
- Download or screenshot the installation instructions.
- Save the QR code and manual details.
- Plan how you will access Wi-Fi at the airport, hotel, or via a backup device.
- Keep the customer support contact details handy.
Why Shouldn't I Install at the Very Last Minute Before Boarding?
Even if early installation is allowed, don't wait until the last few minutes.
During installation, you might discover:
- You can't find the "Add eSIM" menu on your phone.
- The QR code has already been used.
- The carrier lock hasn't been removed.
- Your phone requires a system update.
- The eSIM is already installed but misnamed.
- You need to restart your phone.
- You must manually enter the details.
- The QR code image in your email hasn't downloaded.
- You only have one phone and can't scan a QR code displayed on the same screen.
The safest approach is to complete the installation 1–2 days before departure, while you still have normal Wi-Fi access and can comfortably contact customer support.
Should I Turn On the eSIM Immediately After Installing It?
Not necessarily.
You can separate the "installation" step from the "turning on the line" step. If the product allows early installation, the typical process is:
- Install early.
- Label the line.
- Confirm the profile exists.
- Temporarily turn off the travel eSIM. - Turn it on only after arrival.
However, a small number of plans might require early manual activation or provider-side verification before departure. Always follow your specific order instructions.
Does Turning On the eSIM Start the Timer?
Not necessarily.
The "Turn On This Line," "Use SIM," or eSIM toggle in your phone settings merely allows the device to use that profile. When the plan actually starts counting down is usually determined by the provider's rules.
The following situations can occur:
- The line is ON, but hasn't connected to the destination network, so the timer hasn't started.
- The line is ON, and your phone finds a roaming network in your home country, accidentally triggering an early start.
- The line is OFF, but you already manually started the plan on the provider's website.
- The line still says "Activating," but the provider's system has already started the timer.
Therefore, you cannot rely solely on your phone's toggle switch to judge the plan's status.
How to Determine the Actual Activation Rules for Your Product
Check these sources in order of priority:
1. Specific Product Page
Check if the product page lists:
- Activation policy
- Activation starts
- Validity starts
- Must activate within
- Install before arrival
- Manual activation required
2. Order Confirmation and Installation Emails
The same destination might have multiple providers or different plan types, so a general blog guide is not enough. Your order email is typically much more accurate regarding your specific product rules.
3. Order Management Page
Look for:
- An "Activate" button.
- A start date.
- A validity countdown.
- An installation deadline.
- An "Active" or "Not Active" status.
- The ICCID or plan status.
4. Confirm with Customer Support
If the information above is contradictory, contact customer support before installing, providing your order number and product name.
Don't just ask, "Can I install early?" A more precise question is:
Will installing the profile start the plan's validity period? If not, does the plan start when I manually activate it, or only upon my first connection to a supported network at the destination?
What Information Should a Caylet Product Page Show?
Every eSIM product should clearly list:
| Field | What Should Be Displayed |
|---|---|
| Recommended Installation Time | Before departure or after arrival |
| Activation Method | Automatic, upon first connection, or manual |
| Validity Start | Upon installation, activation, first connection, or specified date |
| Activation Deadline | How soon it must be activated after purchase |
| Installation Limits | Whether the QR code can be reused |
| Location Requirements | Whether you must be in the coverage area |
| Data Roaming | Whether it must be turned ON |
| APN | Automatic or requires manual setup |
| Supported Networks | Partner carriers at the destination |
| Time Zone | The time zone used for dates and daily resets |
If reliable data is not available for a specific field, the product page should not make assumptions.
Is "One Day" of Validity 24 Hours or a Calendar Day?
Different products use different calculation methods.
Continuous 24-Hour System
If a plan activates at 3:00 PM, "one day" might last until 3:00 PM the following day.
Calendar Day System
Regardless of what time it activates that day, the first day might end at local midnight.
Provider-Specified Time Zone
Validity might be calculated based on:
- The destination's local time.
- The provider's system time zone.
- UTC.
- The time zone of the location where the first connection occurred.
This difference is crucial for short-term plans. Don't just see "7 Days" and assume it's exactly 168 hours. If the product page doesn't specify, avoid making assumptions about the exact end time.
Where Do Multi-Country or Regional eSIMs Start Counting From?
Regional plans usually activate upon their first connection to a supported network within the coverage area.
For example, if you have an Asia Regional eSIM that covers multiple countries, and your itinerary is:
Layover in Hong Kong → Japan → South Korea
You need to check if Hong Kong is part of the coverage area. If Hong Kong is covered and you turn the eSIM on during your layover, the timer might start in Hong Kong, rather than waiting until you reach Japan.
Therefore, for multi-country trips, confirm in advance:
- Is the first arrival or layover point in the coverage area?
- Do you want to use data during the layover?
- Will the plan activate in the first covered region?
- Is the validity period long enough to cover the entire trip?
👉 Related Reading: Local vs Regional vs Global eSIM: Which One Should You Choose?
Should I Turn On the eSIM During a Layover?
It depends on your trip.
Good to Turn On During a Layover
- The layover location is within the plan's coverage.
- You need to check gate info, hotel details, or transit schedules.
- You have plenty of validity days.
- You accept that the timer will start from the layover point.
Better to Wait Until the Final Destination
- The layover is very short.
- The airport has reliable Wi-Fi.
- The plan's validity period is short.
- You do not want the timer to start early.
- The layover network is not supported by the plan.
Will Early Installation Consume Data?
Merely downloading the eSIM profile usually does not use plan data.
However, if you do the following after installation:
- Turn ON the eSIM.
- Set it as your Mobile Data line.
- Turn ON Data Roaming.
- And the phone successfully connects to a supported network in your current region.
Then you might start consuming data or trigger the activation.
Therefore, after an early installation, verify that:
- The travel eSIM is kept OFF.
- Mobile data is still using your original line.
- Automatic data switching is disabled.
- Roaming settings for your original SIM are correct.
Is It Normal to See "Activating..." After Early Installation?
It can be normal.
If you have not yet reached the destination, the eSIM cannot connect to the specified partner network, so it might continually display:
Activating
No Service
As long as the profile is physically present on the phone, and the product rules state it activates upon arrival, you usually don't need to keep tweaking it.
Do not delete the eSIM just because you see an "Activating" status.
Can I Save the QR Code and Scan It Upon Arrival?
Technically, yes, but consider three risks:
- Will you have reliable Wi-Fi?
- Is the QR code still within its expiration date?
- Can you reach customer support immediately upon arrival?
If the product does not start the timer upon installation, scanning it early is generally safer. Only save it for arrival if the product explicitly requires you to install it at the destination.
Can I Scan the Same QR Code Multiple Times?
Do not assume you can.
Many eSIM QR codes:
- Can only be installed once.
- Are bound to a single device.
- Become invalid after a successful scan.
- Cannot be reinstalled if deleted.
- Require customer service to issue a replacement.
Therefore, do not delete the profile "just to test it" after an early installation.
What If My Departure Date Changes?
First, determine if the plan has already started the timer.
Not Installed, Not Activated
You usually just need to confirm:
- Is the QR code still valid?
- Does the activation deadline cover the new date?
- Does the product allow date extensions?
- Do you need to modify a pre-selected start date?
Installed, But Not Activated
Check if the product only starts upon the first connection. If so, keep the eSIM turned off and confirm the final activation deadline.
Manually Activated or Timer Already Started
A delay might cause the validity period to run out before you even depart. Contact customer support immediately to see if adjustments are possible, but do not assume it can definitely be paused or reset.
Don't Delete the eSIM Immediately If Your Trip Is Canceled
If your trip is canceled, first check:
- Has the plan been activated?
- Has the validity period started?
- Do you meet the conditions for a refund?
- Can the dates be changed?
- Can you use it for a future destination?
- Are you allowed to exchange the product?
Deleting the eSIM might make it harder for customer support to verify its status and could make the profile unrecoverable. If you have already deleted it, check out our eSIM Deletion Recovery Guide.
Recommended Flow for iPhone
If the product allows early installation:
Before Departure
Settings → Cellular → Add eSIM
After installation:
- Label the line.
- Confirm the eSIM exists.
- Turn OFF "Turn On This Line" for now.
- Do NOT set it as Cellular Data.
- Turn OFF Data Roaming for your original SIM card.
Upon Arrival
Settings → Cellular
Then:
- Turn ON the travel eSIM.
- Go to "Cellular Data" and select the travel eSIM.
- Turn on Data Roaming under the travel eSIM's "Cellular Data Options."
- Turn off unnecessary "Allow Cellular Data Switching."
- Turn off Wi-Fi to test.
In supported regions and plans, iPhones running iOS 26 might display a "Turn On Travel eSIM" notification upon arrival. This prompt might not appear for every device or plan, and you can still manually configure it if it doesn't.
For full steps, read: How to Install and Activate an eSIM on iPhone
Recommended Flow for Samsung Galaxy and Google Pixel
If early installation is allowed, complete the profile download first, then temporarily turn the travel eSIM off.
Samsung Galaxy
Typical location:
Settings → Connections → SIM manager
Upon arrival:
- Turn ON the travel eSIM.
- Set it as Mobile Data.
- Turn on Data Roaming as required.
- Turn off unnecessary automatic data switching.
Google Pixel
Typical location:
Settings → Network & internet → SIMs
Upon arrival:
- Turn ON the travel eSIM.
- Set it as the primary Mobile Data SIM.
- Turn on Roaming.
- Turn off unnecessary automatic data switching.
For full steps, read: How to Install an eSIM on Samsung Galaxy and Google Pixel
Pre-Departure Checklist
- Phone supports eSIM.
- Phone is unlocked from the carrier.
- Read full product activation rules.
- Confirmed whether installation starts the timer.
- Confirmed whether manual activation is required.
- Confirmed installation or activation deadlines.
- Saved the QR code.
- Saved manual installation details.
- Recorded the APN.
- Recorded supported local carriers.
- Confirmed whether data roaming is needed.
- Confirmed if layover locations are in the coverage area.
- Saved customer support contact details.
- Will not delete the eSIM arbitrarily while troubleshooting.
Arrival Activation Checklist
- Turn ON the travel eSIM.
- Set as the mobile data line.
- Turn on Data Roaming as required.
- Turn OFF Data Roaming for original SIM card.
- Turn OFF unnecessary automatic data switching.
- Wait a few minutes to connect to the network.
- Toggle Airplane Mode if necessary.
- Turn off Wi-Fi to test mobile data.
- Check if the plan status has updated.
- Record the actual time you started using the plan.
Frequently Asked Questions
Can I install the eSIM a month in advance?
Only if the product explicitly allows it, installation doesn't start the timer, and the QR code hasn't expired. Even if technically possible, it is usually unnecessary to install it that early.
What is the most recommended time to install?
For products that allow early installation, 1–2 days before departure is usually the sweet spot: you have time to resolve issues, and it's not too far from your departure date.
Will the timer start if I install it but keep it turned off?
For many products, no, but you cannot generalize. You must check the specific product's activation policy and validity rules.
Is it safer to install after arrival?
Not necessarily. It prevents early consumption of validity days for "install-to-start" products, but it increases the risk of not having Wi-Fi, experiencing QR code errors, or discovering device incompatibilities when you need the internet most.
If the eSIM says "Activating," has the timer started?
You can't judge solely by the phone's status. Some eSIMs show "Activating" until they reach the destination, while others might already be activated on the provider's end.
Can I pause it after manually pressing "Activate"?
Generally, no. Whether you can pause, reset, or delay the plan depends on the product's rules.
Will a multi-country eSIM start counting in my layover location?
If the layover is within the coverage area and the product starts upon first connection, it may very well activate during your layover.
Do I need Wi-Fi to install?
Most phones require an internet connection to download the eSIM profile. We recommend installing it over stable Wi-Fi before departure. Some devices and regions may offer alternative activation methods, but they should not be relied upon as a guarantee.
Does 7 Days of validity equal 168 hours?
Not always. It could be calculated by continuous hours, calendar days, or a provider-specified time zone. Check the product rules.
If my trip is delayed, can I reset the start date?
Only some products support this. Do not activate or delete the eSIM; contact customer support as soon as possible to check the activation deadline.
Can I delete it after installing and rescan it when I depart?
Not recommended. Many QR codes can only be installed once and cannot be recovered if deleted.
Official Reference Materials
Device interfaces and travel eSIM features may change with system updates:
- Apple: Use an eSIM while traveling internationally with your iPhone
- Apple: Set up an eSIM on your iPhone
- Apple: If you can't set up an eSIM on your iPhone
- Google Pixel: Set up an eSIM
- Samsung: Galaxy eSIM and supported network carriers
For rules on installation, activation, and validity periods, always refer to your specific Caylet product page, order emails, and order management page as the ultimate authority.
Summary
When you should install an eSIM depends on the product's validity start conditions.
If the product confirms:
- Early installation is allowed.
- Installation does not start the timer.
- It only activates upon first connection to the destination network.
The safest approach is usually:
- Install it 1–2 days before departure over a stable Wi-Fi connection.
- Confirm the eSIM has appeared on your phone.
- Temporarily keep the travel eSIM turned OFF.
- Turn it ON only after arriving at your destination.
- Set it as your mobile data line.
- Turn on Data Roaming as required.
- Test the connection.
If the product starts counting days upon installation, manual activation, or a specific date, adjust your timing according to those specific instructions.
Do not assume "all travel eSIMs are the same," and do not wait until you have absolutely no internet access to check if your phone is compatible for the first time.


